By: CS2103-AY1819S1-W14-2 Since: Sep 2018 Licence: MIT
1. Introduction
Welcome to ThanePark! The purpose of this documentation is to assist you in your transition to begin developmental work on ThanePark.
If you are a developer looking to adopt ThanePark for your own uses, go to Setting up.
If you wish to contribute to ThanePark, go to Developing the application.
If you wish to update documentation of ThanePark, go to Documentation.
2. About
ThanePark is a desktop application for theme park management. The application is optimized for keyboard-oriented users and retains user-friendly graphics that informs users of their decisions in a glance.
3. Setting up
Before you get started on development on the application, you will need to complete the following steps below.
3.1. Checking Software Prerequisites
To ensure a smooth transition into your development, check that the following software versions are installed:
-
JDK
9or laterJDK 10on Windows will fail to run tests in headless mode due to a JavaFX bug. Windows developers are highly recommended to use JDK9. -
IntelliJ IDE
IntelliJ by default has Gradle and JavaFx plugins installed.
Do not disable them. If you have disabled them, go toFile>Settings>Pluginsto re-enable them.
3.2. Setting up the project in your computer
After you have installed the correct software, follow the steps below to setup your development environment locally:
-
Fork this repo, and clone the fork to your computer
-
Open IntelliJ (if you are not in the welcome screen, click
File>Close Projectto close the existing project dialog first) -
Set up the correct JDK version for Gradle
-
Click
Configure>Project Defaults>Project Structure -
Click
New…and find the directory of the JDK
-
-
Click
Import Project -
Locate the
build.gradlefile and select it. ClickOK -
Click
Open as Project -
Click
OKto accept the default settings -
Open a console and run the command
gradlew processResources(Mac/Linux:./gradlew processResources). It should finish with theBUILD SUCCESSFULmessage.
This will generate all resources required by the application and tests. -
Open
XmlAdaptedRide.javaandMainWindow.javaand check for any code errors. Repeat this for the test folder as well (e.g. checkXmlUtilTest.javaandHelpWindowTest.javafor code errors, and if so, resolve it the same way)Due to an ongoing issue with some of the newer versions of IntelliJ, code errors may be detected even if the project can be built and run successfully To resolve this, place your cursor over any of the code section highlighted in red. Press ALT+ENTER, and select Add '--add-modules=…' to module compiler optionsfor each error
3.3. Verifying the Setup
It is recommended that you verify the setup by trying the following actions:
-
Run the
seedu.thanepark.MainAppand try a few commands -
Run the tests to ensure they all pass.
3.4. Configuring your Integrated Development Environment
Some configurations of your Integrated Development Environment need to be set:
3.4.1. Configuring the coding style
This project follows oss-generic coding standards. IntelliJ’s default style is mostly compliant with ours but it uses a different import order from ours. To rectify:
-
Go to
File>Settings…(Windows/Linux), orIntelliJ IDEA>Preferences…(macOS) -
Select
Editor>Code Style>Java -
Click on the
Importstab to set the order-
For
Class count to use import with '*'andNames count to use static import with '*': Set to999to prevent IntelliJ from contracting the import statements -
For
Import Layout: The order isimport static all other imports,import java.*,import javax.*,import org.*,import com.*,import all other imports. Add a<blank line>between eachimport
-
Optionally, you can follow the UsingCheckstyle.adoc document to configure Intellij to check style-compliance as you write code.
3.4.2. Updating documentation to match your fork
After you fork the repo, the documentation will still have the CS2103-W14-2 branding and refer to the CS2103-W14-2/main repo.
If you plan to develop this fork as a separate product (i.e. instead of contributing to CS2103-W14-2/main), you should do the following:
-
Configure the site-wide documentation settings in
build.gradle, such as thesite-name, to suit your own project. -
Replace the URL in the attribute
repoURLinDeveloperGuide.adocandUserGuide.adocwith the URL of your fork.
3.4.3. Setting up CI
Set up Travis to perform Continuous Integration (CI) for your fork. See UsingTravis.adoc to learn how to set it up.
After setting up Travis, you can optionally set up coverage reporting for your team fork (see UsingCoveralls.adoc).
| Coverage reporting could be useful for a team repository that hosts the final version but it is not that useful for your personal fork. |
Optionally, you can set up AppVeyor as a second CI (see UsingAppVeyor.adoc).
| Having both Travis and AppVeyor ensures your App works on both Unix-based platforms and Windows-based platforms (Travis is Unix-based and AppVeyor is Windows-based) |
3.4.4. Getting started with coding
When you are ready to start coding:
-
Get some sense of the overall design by reading Section 4.1, “Architecture”.
-
Take a look at [GetStartedProgramming].
4. Design
This section will help you better understand the software architecture of ThanePark.
4.1. Architecture
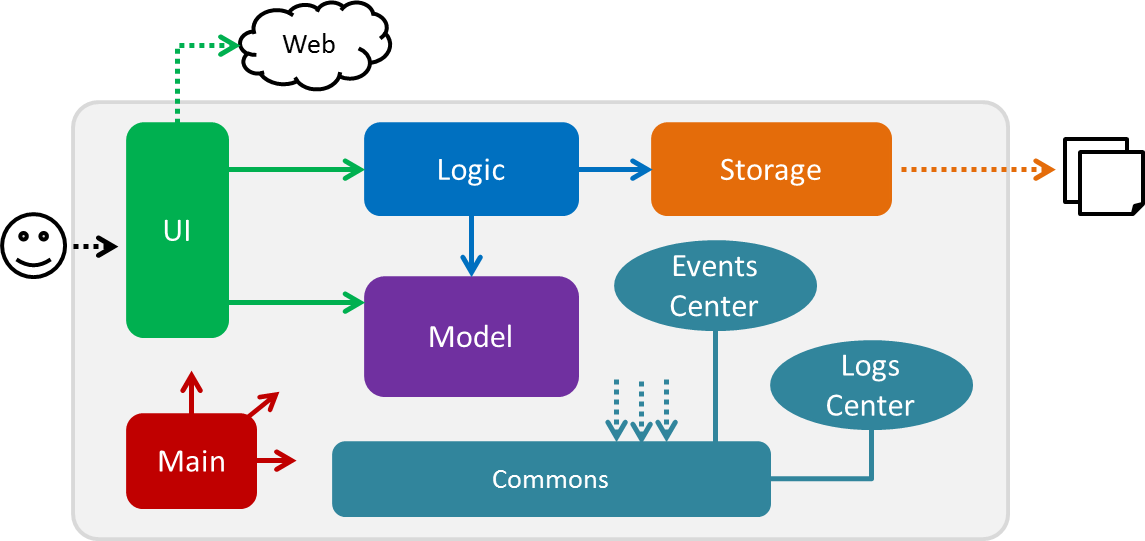
4.2. Main component
Main has only one class called MainApp. It is responsible for,
-
At app launch: Initializes the components in the correct sequence, and connects them up with each other.
-
At shut down: Shuts down the components and invokes cleanup method where necessary.
-
Commonsrepresents a collection of classes used by multiple other components. Two of those classes play important roles at the architecture level.-
EventsCenter: This class (written using Google’s Event Bus library) is used by components to communicate with other components using events (i.e. a form of Event Driven design) -
LogsCenter: Used by many classes to write log messages to the App’s log file.
-
-
UI: The UI of the App. -
Logic: The command executor. -
Model: Holds the data of the App in-memory. -
Storage: Reads data from, and writes data to, the hard disk.
Each of the four components
-
Defines its API in an
interfacewith the same name as the Component. -
Exposes its functionality using a
{Component Name}Managerclass.
For example, the Logic component (see the class diagram given below) defines it’s API in the Logic.java interface and exposes its functionality using the LogicManager.java class.
Events-Driven nature of the design
The Sequence Diagram below shows how the components interact for the scenario where the user issues the command delete 1.

delete 1 command (part 1)
Note how the Model simply raises a ThaneParkChangedEvent when the Thane Park data are changed, instead of asking the Storage to save the updates to the hard disk.
|
The diagram below shows how the EventsCenter reacts to that event, which eventually results in the updates being saved to the hard disk and the status bar of the UI being updated to reflect the 'Last Updated' time.
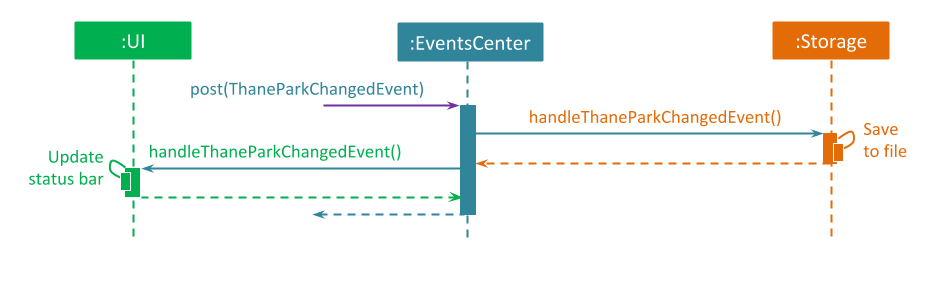
delete 1 command (part 2)
Note how the event is propagated through the EventsCenter to the Storage and UI without Model having to be coupled to either of them. This is an example of how this Event Driven approach helps us reduce direct coupling between components.
|
The sections below give more details of each component.
4.3. UI component
The UI component is responsible for any UI-related functionality of the App.
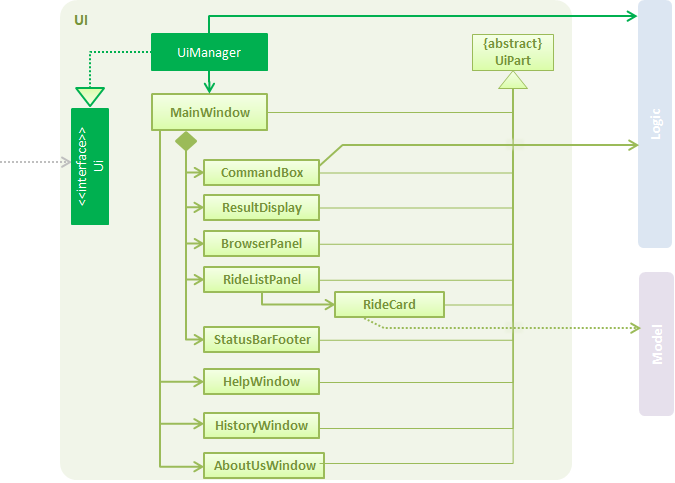
API : Ui.java
The UI consists of a MainWindow that is made up of parts e.g.CommandBox, ResultDisplay, RideListPanel, StatusBarFooter, BrowserPanel etc. All these, including the MainWindow, inherit from the abstract UiPart class.
The UI component uses JavaFx UI framework. The layout of these UI parts are defined in matching .fxml files that are in the src/main/resources/view folder. For example, the layout of the MainWindow is specified in MainWindow.fxml
The UI component,
-
Executes user commands using the
Logiccomponent. -
Binds itself to some data in the
Modelso that the UI can auto-update when data in theModelchange. -
Responds to events raised from various parts of the App and updates the UI accordingly.
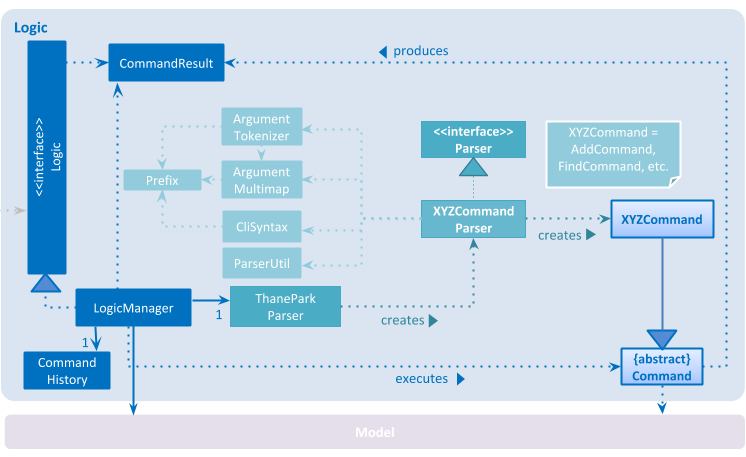
4.4. Logic component
The Logic component is responsible for handling and executing command logic.
API :
Logic.java
-
Logicuses theThaneParkParserclass to parse the user command. -
This results in a
Commandobject which is executed by theLogicManager. -
The command execution can affect the
Model(e.g. adding a ride) and/or raise events. -
The result of the command execution is encapsulated as a
CommandResultobject which is passed back to theUi.
Given below is the Sequence Diagram for interactions within the Logic component for the execute("delete 1") API call.
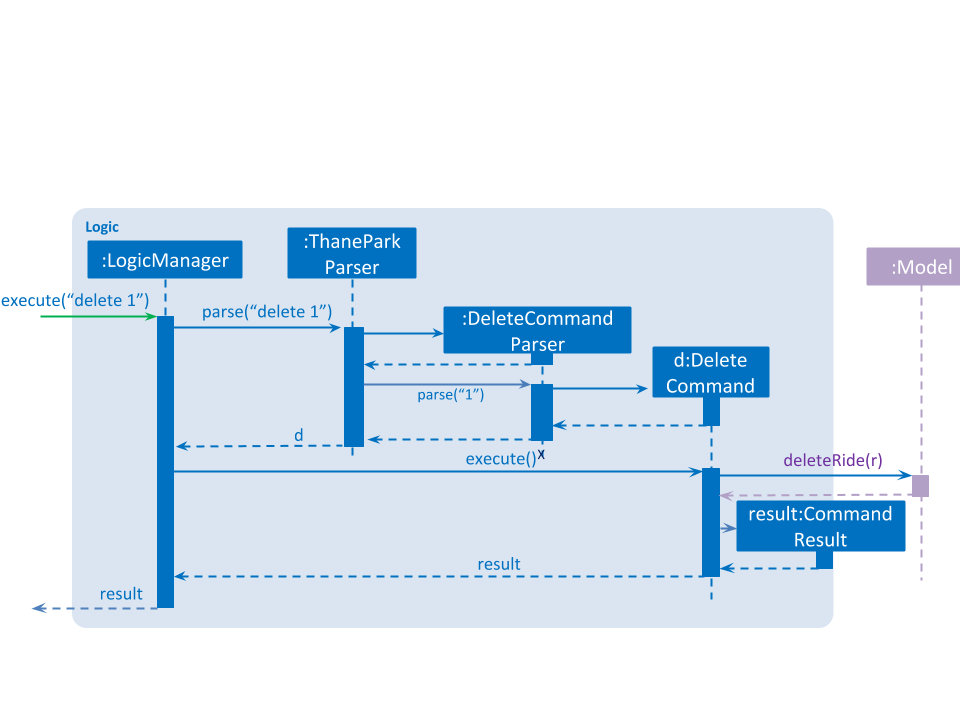
delete 1 Command4.5. Model component
The Model component stores an internal representation of the state of the application in memory.
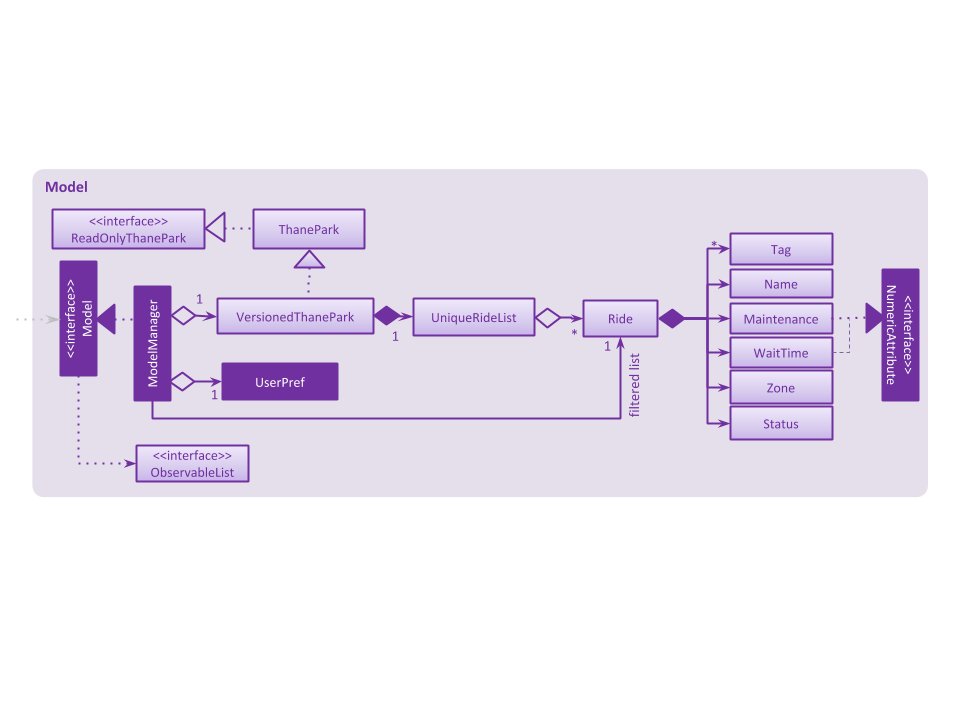
API : Model.java
The Model,
-
stores a
UserPrefobject that represents the user’s preferences. -
stores the Thane Park data.
-
exposes an unmodifiable
ObservableList<Ride>that can be 'observed' e.g. the UI can be bound to this list so that the UI automatically updates when the data in the list change. -
does not depend on any of the other three components.
As a more OOP model, we can store a Tag list in Thane Park, which Ride can reference. This would allow Thane Park to only require one Tag object per unique Tag, instead of each Ride needing their own Tag object. An example of how such a model may look like is given below.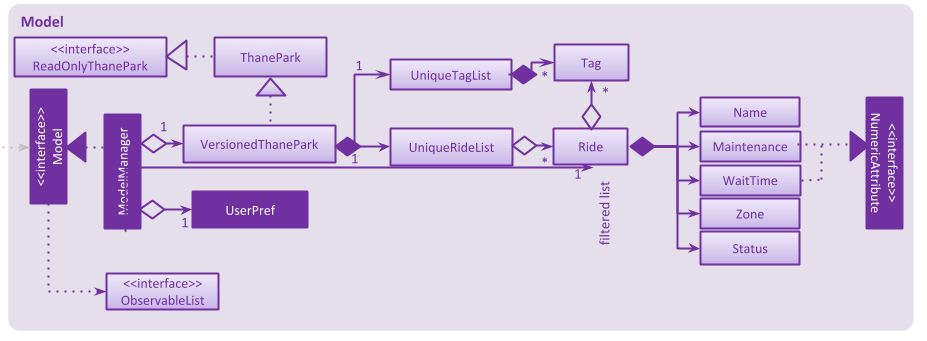
|
4.6. Storage component
The Storage component is responsible for reading data from, and writing data to, the hard disk.
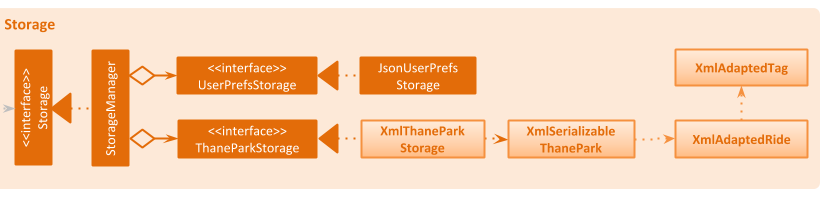
API : Storage.java
The Storage component,
-
can save
UserPrefobjects in json format and read it back. -
can save the Thane Park data in xml format and read it back.
5. Implementation
This section describes some noteworthy details on how certain features are implemented.
5.1. Filter Feature
This section documents how filter is implemented and how it works.
5.1.1. Current Implementation
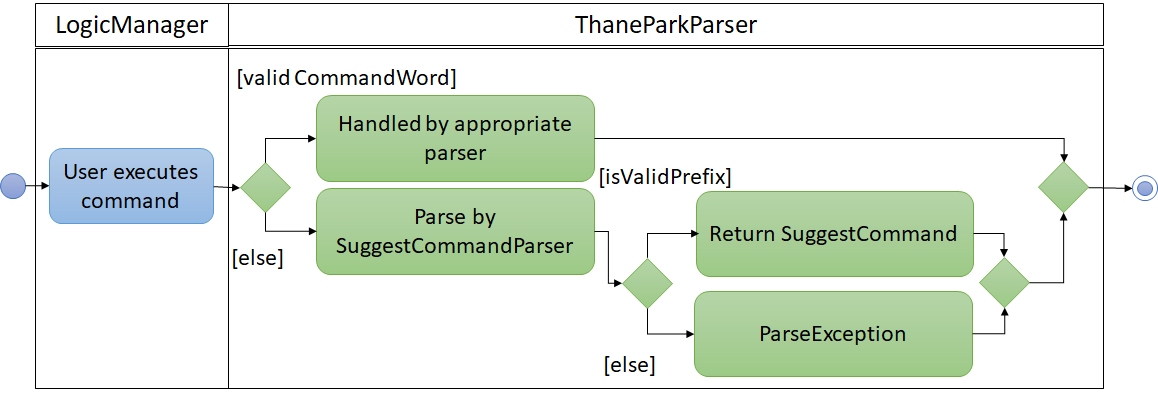
The execution of the filter command is simple and linear as the following activity diagram would show:
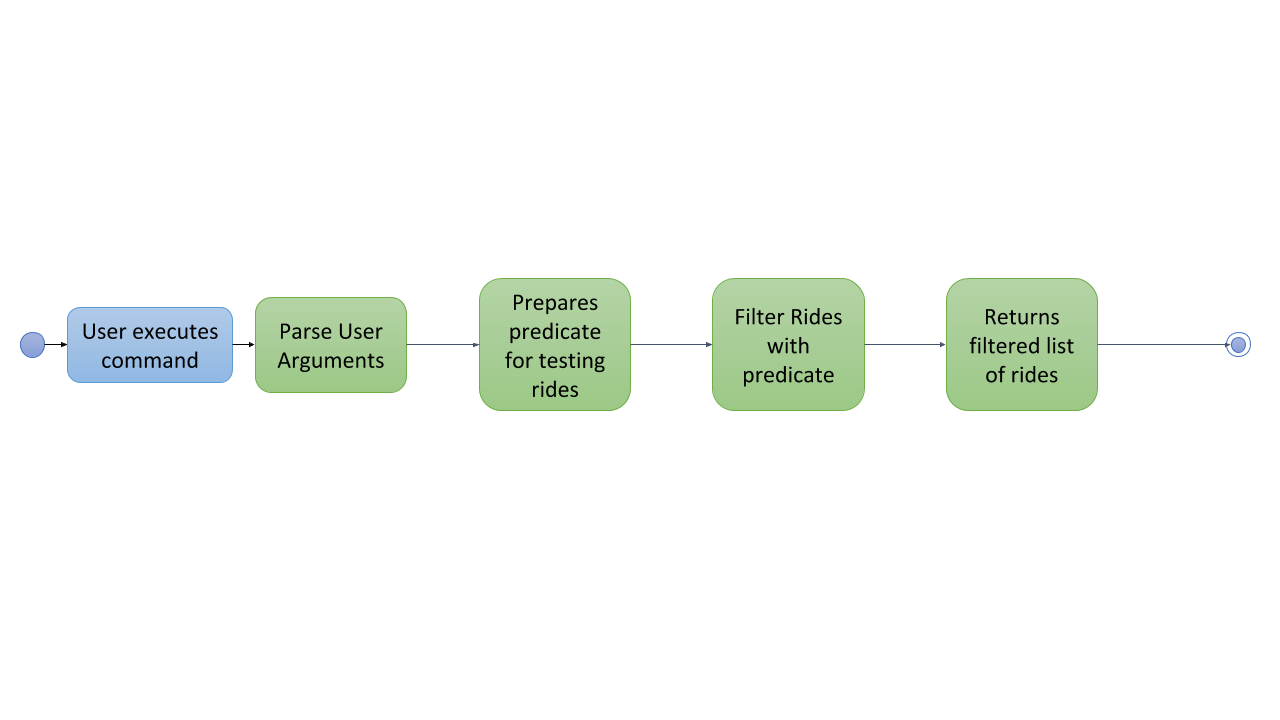
The following sequence diagram will show how the filter command works:
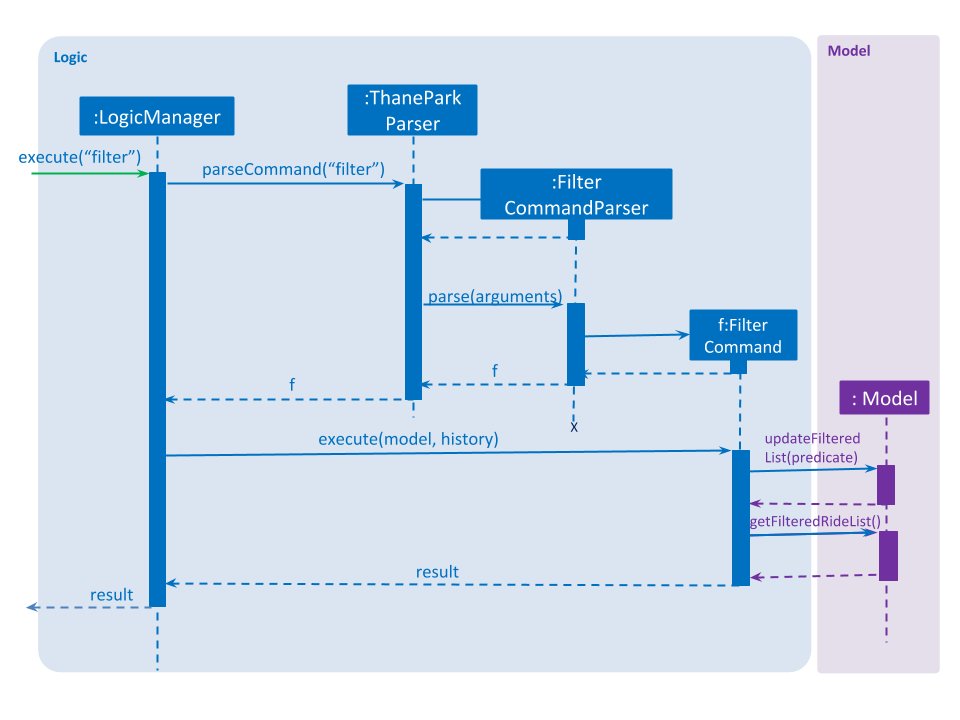
The feature is implemented with the help of FilterCommand and AttributePredicate class. When the
ThaneParkParser parses the user input and finds the filter command word filter it calls a new FilterCommandParser to
parse the arguments from the user input.
It checks if there are any of the maintenance or waiting time prefix in the arguments. If any of the prefixes are present,
an AttributePredicate is created with the operator (‘<', ‘>’, '< =' or '> =' or '==') and the NumericAttribute they
are checking for (ie Maintenance or WaitTime). The AttributePredicates are added to a list. The user can add any
amount of predicates that they want, like 3 predicates e.g. filter w/< 50 w/ > 5 m/>10 and the list would contain 3
predicates and if the user decides to input only one predicate, the list will only contain one.
A new RideContainsConditionPredicate is instantiated with the list of AttributePredicates. The FilterCommandParser will
return a new FilterCommand with the RideContainsConditionPredicate in it.
The LogicManager executes the command, and the RideContainsConditionPredicate will be set as the predicate to filter
the list of rides and it will check if the ride fulfils the required predicate(s). The RideContainsConditionPredicate
will test if each ride fulfills the required conditions using this method:
    public boolean test(Ride ride) {
        return attributePredicates.stream().allMatch(p -> {
            NumericAttribute attributeToTest = p.getAttribute();
            NumericAttribute rideAttributeToTest = ride.getAttribute(attributeToTest);
            return p.test(rideAttributeToTest);
        });
    }
So it should be pretty simple to add new NumericAttributes to the rides like ratings if you wish to with minimal
changes to other classes, as long as relevant methods are added to FilterCommandParser to handle the new NumericAttributes.
After all of the rides in the application are tested, a list of filtered rides would be returned and shown to the user.
5.1.2. Design Considerations
Aspect: Data structure to support filter commands
-
Alternative 1(Current Choice): Abstract attributes that contain numeric values into a separate class and create a AttributePredicate to test the attribute
-
Pros: More numeric attributes can be easily added and minimal changes are required to filter new attributes
-
Cons: More classes would need to be implemented to handle this feature
-
-
Alternative 2: Give the entire string condition to the RideContainsConditionPredicate to test.
-
Pros: Classes do not need to abstracted, and thus would be easier to implement
-
Cons: RideContainsConditionPredicate would carry out parsing functions which would make it less cohesive
-
5.2. Command Management Feature
5.2.1. Current Implementation
The Command Management feature is responsible for making ThanePark application easier to use.
It can be decomposed into the following segments:
Help
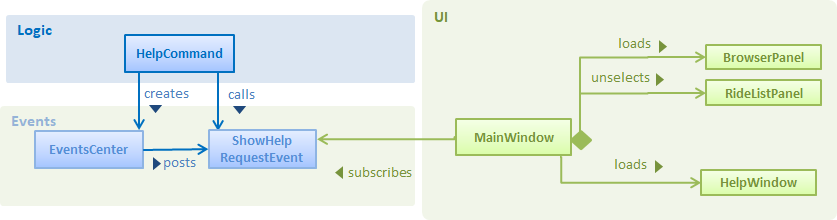
The help mechanism is facilitated by the ShowHelpRequestEvent.
When the user executes a HelpCommand, the required level of help is encoded in ShowHelpRequest.
This event type is subscribed to by MainWindow, which will load the respective help page in the required window
(BrowserPanel or HelpWindow). Most of these classes belong to the User Interface (UI) component.
These interactions are illustrated in the class diagram below:
Autocomplete
The autocomplete mechanism is facilitated by SuggestCommand.
It extends Command and serves as a special kind of Command that cannot be directly invoked by the LogicManager.
A new instance of SuggestCommand is created whenever ThaneParkParser fails to find a matching CommandWord,
or when TAB is pressed inside the Command Box. See the 2 figures below:
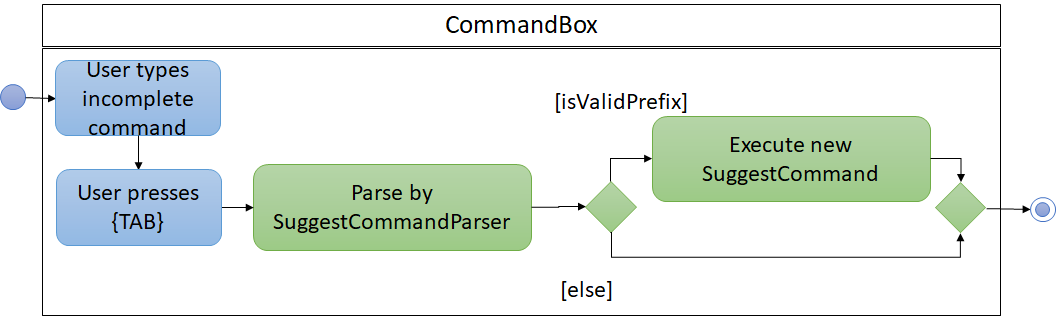
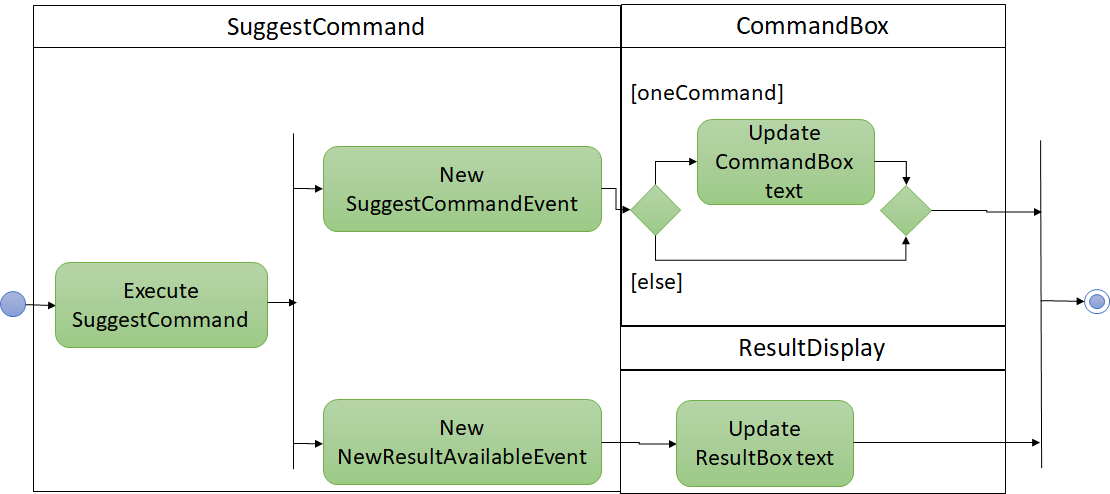
The application will then proceed with executing the SuggestCommand, which returns prefix-matched Command s.
These matching Command s are reflected in both CommandResult and ShowHelpRequestEvent, which will in turn update
ResultDisplay and CommandBox text. See figure below:
You can easily add other pattern matching heuristics such as nearest word distance by implementing the following interface, PatternMatcher:
public interface PatternMatcher {
    /**
     * Matches a list of items as Strings against a given pattern.
     */
    public String[] matchPattern(String[] items, String pattern);
}
A possible implementation of a prefix matcher is shown below:
public class PrefixMatcher implements PatternMatcher {
    private static final String PATTERN_PREFIX = "^%1$s.*";
    /**
     * Default constructor
     */
    public PrefixMatcher() {
        ;
    }

    @Override
    public String[] matchPattern(String[] items, String pattern) {
        return Arrays.stream(items).filter(s
            -> s.matches(String.format(PATTERN_PREFIX, pattern))).toArray(String[]::new);
    }

}
History
The history mechanism is facilitated by CommandHistory and CommandsLogCenter.
CommandHistory maintains the history as a list of user inputs during the session,
and interfaces with CommandsLogCenter to handle the retrieval and persistent storage
of user inputs executed across sessions.
Given below are 2 example usage scenarios to illustrate the behavior of the history mechanism.
-
Example scenario 1: User requests for current session’s history.
Step 1. User executeshistory.
Step 2. The list of user inputs in the current session is retrieved fromCommandHistory.
Step 3. ANewResultAvailableEventis raised within theLogiccomponent. Step 4. The result panel displays the list of user inputs upon notification by the event. -
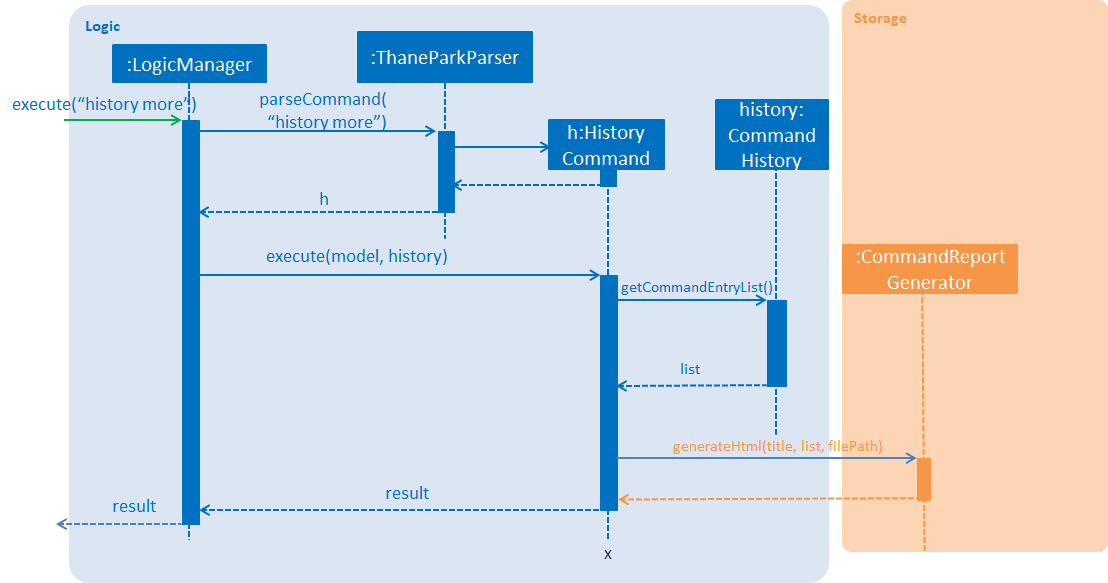
Example scenario 2: User requests for cumulative history.
When the cumulative history of all commands is requested through history more command, a HTML report is generated.
The process of generating a HTML report upon execution of history more is illustrated in the Sequence Diagram below.
5.2.2. Design Considerations
Aspect: Handling UI interactions in help
-
Alternative 1 (current choice): Subscribe
MainWindowtoShowHelpRequestEvent.-
Pros: Cohesive. Every
UIcomponent affected byShowHelpRequestEventare handled throughMainWindow. -
Cons: Difficult to implement. Interactions between
MainWindowand its childUIcomponents must be carefully handled. Easy to cause bugs if not handled appropriately.
-
-
Alternative 2: Subscribe
BrowserPanel,HelpWindowandRideListPaneltoShowHelpRequestEvent.-
Pros: Easy to implement. These
UIcomponents can directly perform whatever is required. -
Cons: High dependency. When a modification to
ShowHelpRequestEventis required, all of these classes may need to be modified.
-
Aspect: Handling autocomplete text replacement
-
Alternative 1 (current choice): Handle autocomplete text replacement through
SuggestCommandEvent.-
Pros: Flexible. Easy to modify text replacement behavior through
SuggestCommandEvent. Can be used by both Tab and Enter. Open for extension to other keystrokes or actions that lead to autocompletion. -
Cons: Difficult to implement as it requires some understanding of the
EventsCenterand handling of the various Event types in the application.
-
-
Alternative 2: Handle autocomplete through the existing
NewResultAvailableEvent.-
Pros: Easy to implement. Can modify
NewResultAvailableEventto easily satisfy most requirements. -
Cons: Difficult to extend. When modifying behavior of text autocompletion, modification of both
CommandBoxandResultDisplaymay be required.
-
Aspect: Storing command history
-
Alternative 1 (current choice): Store every command entry in a separate xml file.
-
Pros: Flexible. Able to format the file with little constraint to meet storage requirements.
-
Cons: Low code reuse. Does not utilise the existing
LogsCenterfor ThanePark.
-
-
Alternative 2: Store command entries using the existing
LogsCenterfor ThanePark.-
Pros: High code reuse. Developers know that all logging within the ThanePark is done by
LogsCenter. -
Cons: High dependency and difficult to implement. When a modification to
LogsCenteris required, the modification of command history storage may be required. Additionally, the parsing of command history from the existingLogsCenterlogs may require substantial modifications.
-
5.3. View Status Feature
This section documents how viewstatus is being implemented.
5.3.1. Current Implementation
The view status feature is implemented with the help of ViewStatusCommand and RideStatusPredicate classes.
As seen in the sequence diagram below, when the ThaneParkParser class parses the user input of viewstatus,
it calls a new ViewStatusCommandParser to parse the arguments from the user input.
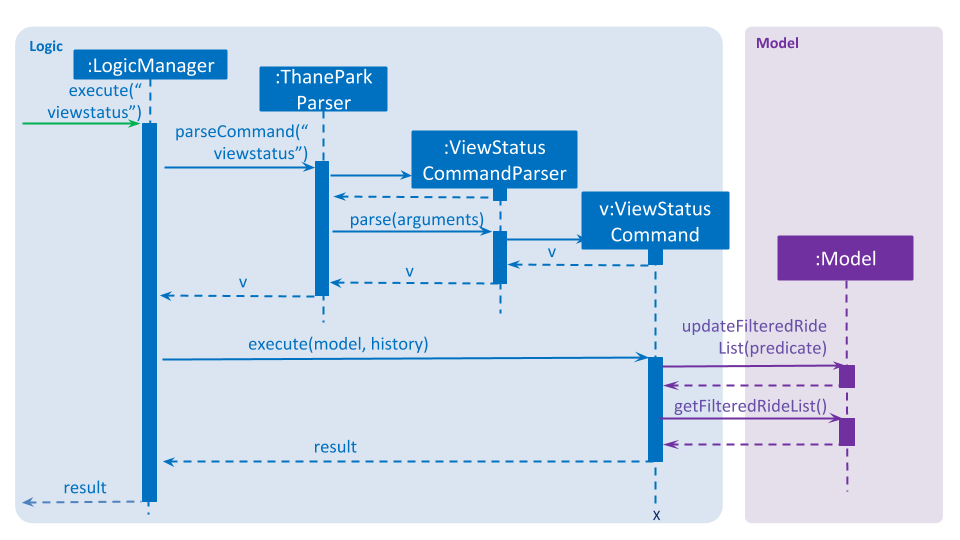
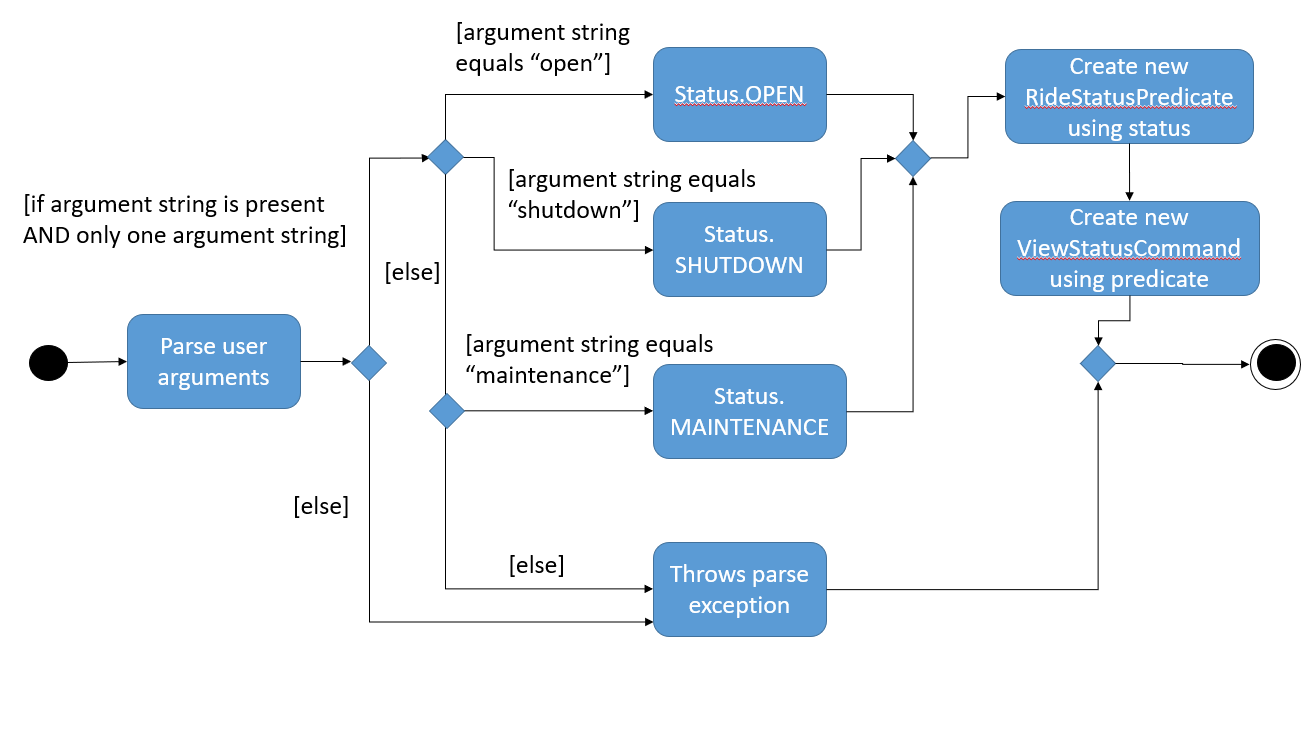
ViewStatusCommandParserAs seen in the diagram above, the ViewStatusCommandParser class checks the arguments for keywords relating to the status of the rides.
If there are more than one strings found or the argument string is not one of the three statuses,
it will throw a ParseException, letting the user know that the command format is wrong.
Conversely, it will compare the argument with the statuses and create a Status enumeration.
A new RideStatusPredicate is instantiated with the Status enumeration.
The ViewStatusCommandParser will return a new ViewStatusCommand containing RideStatusPredicate.
The LogicManager execute the command, and uses the RideStatusPredicate to filter the list of rides for rides that fulfill the required predicate(s).
A list of filtered rides would be returned.
5.3.2. Design Considerations
Aspect: Data structure to support view status command
-
Alternative 1(Current choice): Handle checking of status by passing the
Statusenumeration toRideStatusPredicateto test.-
Pros: Code is more cohesive as each class is more focused.
-
Cons: More classes are required to implement the check.
-
-
Alternative 2: Handle checking of status in ViewStatusCommand by using a lambda expression to express the predicate.
-
Pros: Easier to implement as less classes are needed.
-
Cons: Reduced modularity as predicate logic is not abstracted.
-
5.4. Open/Shutdown Feature
This section documents how open/shutdown features are implemented and how they work. Note that open and shutdown
features are very similar to each other.
5.4.1. Current Implementation
The OpenActivityDiagram below show the execution flow of OpenCommand:
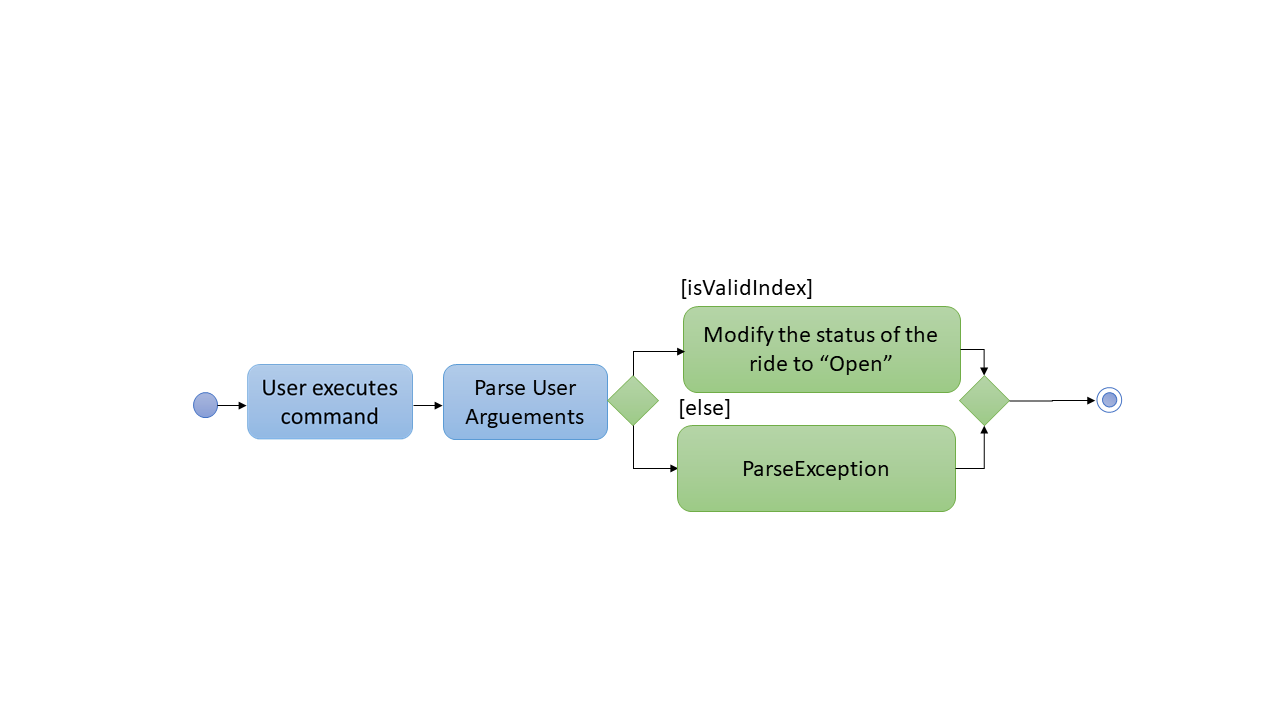
OpenCommandThe following sequence diagram will show how the open/shutdown feature works:
As seen in the diagram above, the open function is implemented with the help of OpenCommand and
UpdateRideDescriptor class. When the ThaneParkParser parses the user input and finds the open command word open,
it calls a new OpenCommandParser to parse the arguments from the user input.
Next, the OpenCommandParser will parse the arguments from the user input into an index and
return a new OpenCommand with the index as the parameter.
Finally, the LogicManager will execute the open command, and the index will be used to find the ride from the
list.
After that, the open command will change the status of the ride to Open by utilising the UpdateRideDescriptor
class.
5.4.2. Design Considerations
Aspect: Data structure to support open/shutdown commands
-
Alternative 1(Current choice): Change the status of the ride inside the
opencommand and include theUpdateRideDescriptorin theopencommand as well.-
Pros: This would be easier to implement as
UpdateRideDescriptorclass no need to abstracted out from theopenCommandclass. -
Cons:
UpdateRideDescriptorwill modify the status of rides inside theopenCommandclass which will make theopenCommandclass less cohesive.
-
-
Alternative 2: Abstracting
UpdateRideDescriptorinto a separate class and modify the status of rides in the separate class instead ofopenCommandclass.-
Pros: The
openCommandwill be more cohesive. -
Cons: More classes would need to be implemented to modify the status of rides.
-
5.5. Undo/Redo feature
5.5.1. Current Implementation
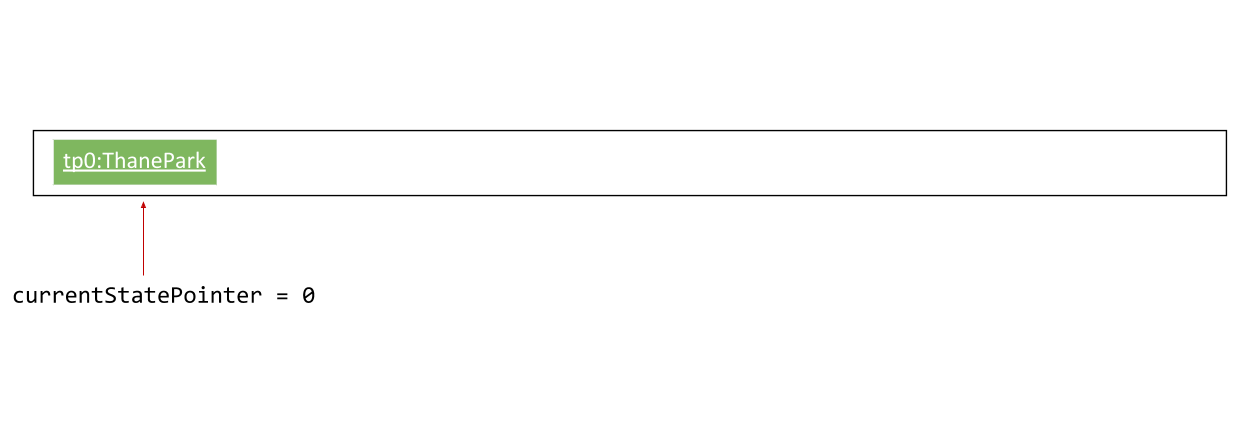
The undo/redo mechanism is facilitated by VersionedThanePark.
It extends ThanePark with an undo/redo history, stored internally as an ThaneParkStateList and currentStatePointer.
Additionally, it implements the following operations:
-
VersionedThanePark#commit()— Saves the current zone book state in its history. -
VersionedThanePark#undo()— Restores the previous zone book state from its history. -
VersionedThanePark#redo()— Restores a previously undone zone book state from its history.
These operations are exposed in the Model interface as Model#commitThanePark(), Model#undoThanePark() and Model#redoThanePark() respectively.
Given below is an example usage scenario and how the undo/redo mechanism behaves at each step.
Step 1. The user launches the application for the first time. The VersionedThanePark will be initialized with the initial zone book state, and the currentStatePointer pointing to that single zone book state.
Step 2. The user executes delete 5 command to delete the 5th ride in the zone book. The delete command calls Model#commitThanePark(), causing the modified state of the zone book after the delete 5 command executes to be saved in the ThaneParkStateList, and the currentStatePointer is shifted to the newly inserted zone book state.

Step 3. The user executes add n/David … to add a new ride. The add command also calls Model#commitThanePark(), causing another modified zone book state to be saved into the ThaneParkStateList.
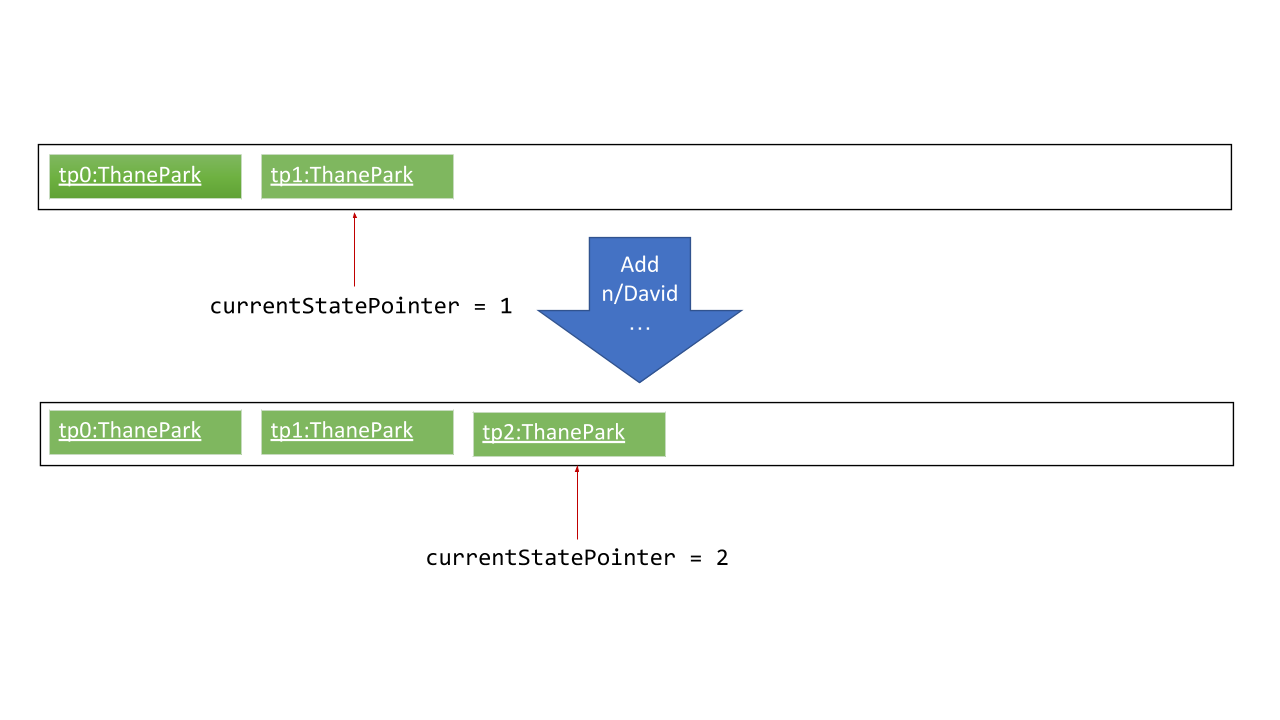
If a command fails its execution, it will not call Model#commitThanePark(), so the zone book state will not be saved into the ThaneParkStateList.
|
Step 4. The user now decides that adding the ride was a mistake, and decides to undo that action by executing the undo command. The undo command will call Model#undoThanePark(), which will shift the currentStatePointer once to the left, pointing it to the previous zone book state, and restores the zone book to that state.
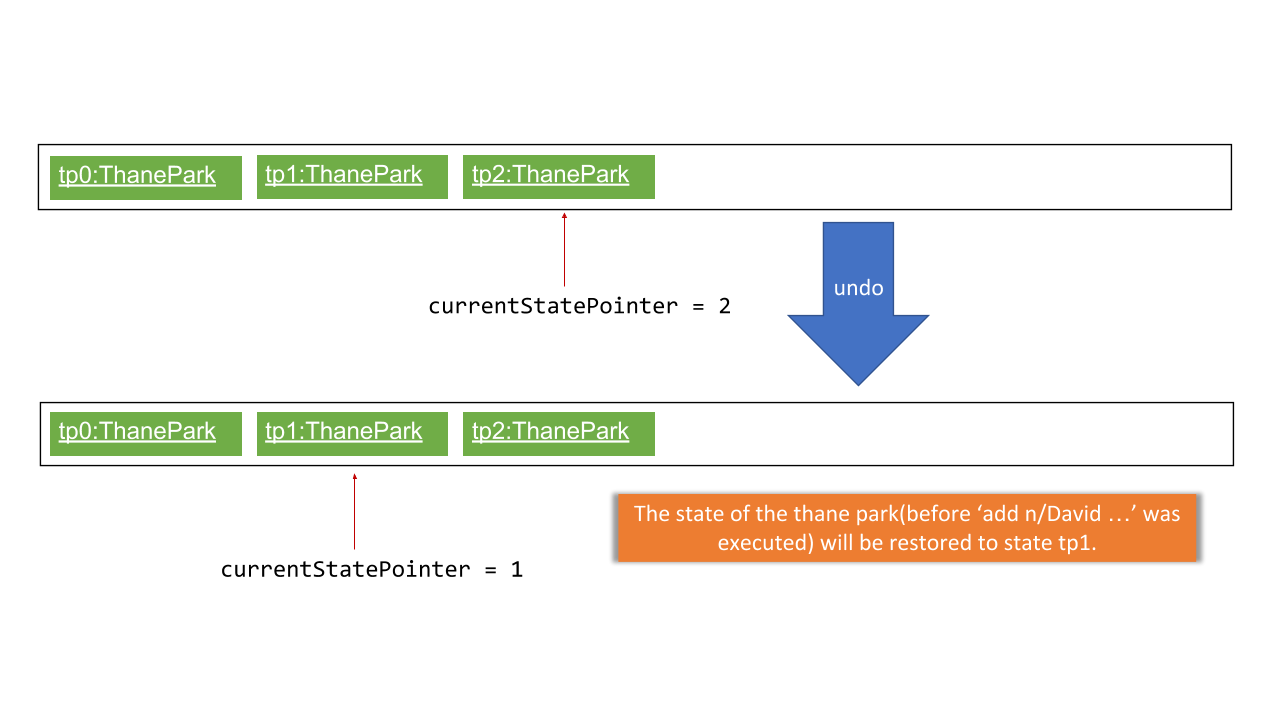
If the currentStatePointer is at index 0, pointing to the initial zone book state, then there are no previous zone book states to restore. The undo command uses Model#canUndoThanePark() to check if this is the case. If so, it will return an error to the user rather than attempting to perform the undo.
|
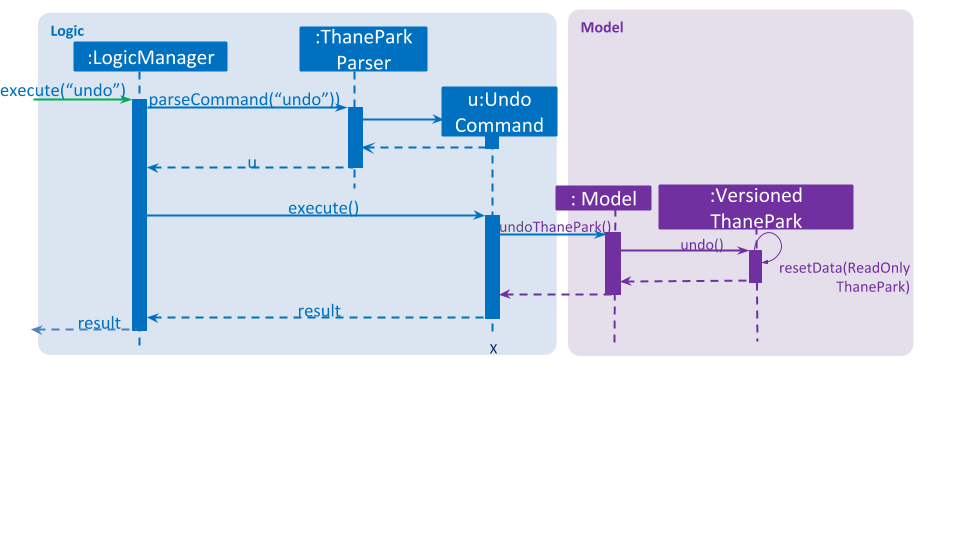
The following sequence diagram shows how the undo operation works:
The redo command does the opposite — it calls Model#redoThanePark(), which shifts the currentStatePointer once to the right, pointing to the previously undone state, and restores the zone book to that state.
If the currentStatePointer is at index ThaneParkStateList.size() - 1, pointing to the latest zone book state, then there are no undone zone book states to restore. The redo command uses Model#canRedoThanePark() to check if this is the case. If so, it will return an error to the user rather than attempting to perform the redo.
|
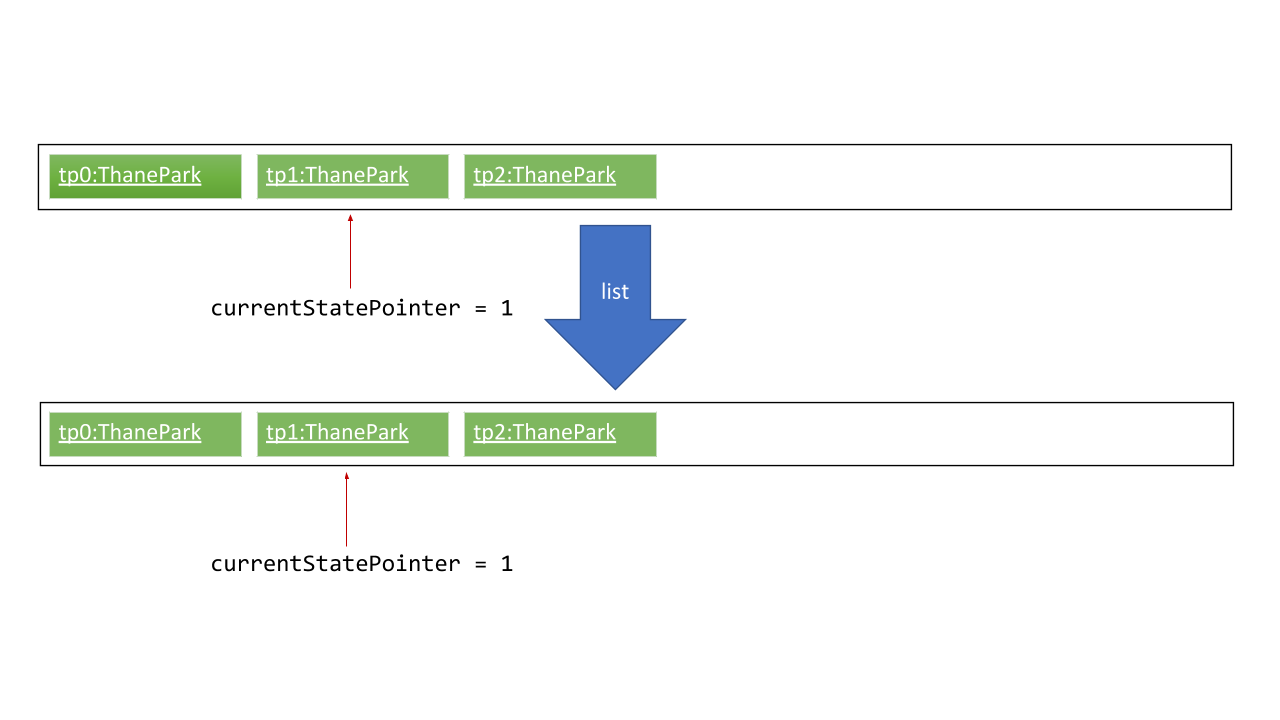
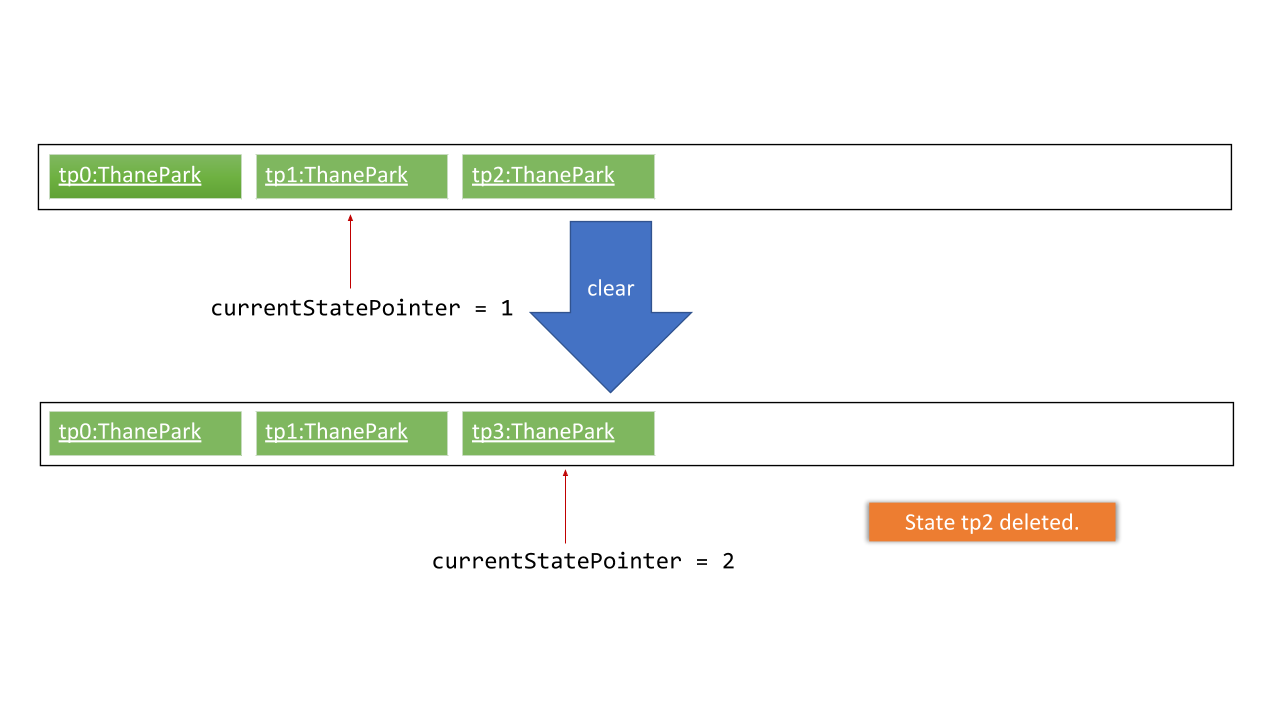
Step 5. The user then decides to execute the command list. Commands that do not modify the zone book, such as list, will usually not call Model#commitThanePark(), Model#undoThanePark() or Model#redoThanePark(). Thus, the ThaneParkStateList remains unchanged.
Step 6. The user executes clear, which calls Model#commitThanePark(). Since the currentStatePointer is not pointing at the end of the ThaneParkStateList, all zone book states after the currentStatePointer will be purged. We designed it this way because it no longer makes sense to redo the add n/David … command. This is the behavior that most modern desktop applications follow.
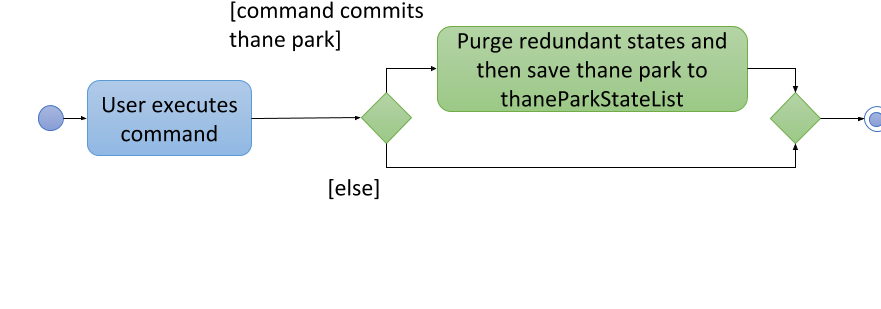
The following activity diagram summarizes what happens when a user executes a new command:
5.5.2. Design Considerations
Aspect: How undo & redo executes
-
Alternative 1 (current choice): Saves the entire zone book.
-
Pros: Easy to implement.
-
Cons: May have performance issues in terms of memory usage.
-
-
Alternative 2: Individual command knows how to undo/redo by itself.
-
Pros: Will use less memory (e.g. for
delete, just save the ride being deleted). -
Cons: We must ensure that the implementation of each individual command are correct.
-
Aspect: Data structure to support the undo/redo commands
-
Alternative 1 (current choice): Use a list to store the history of zone book states.
-
Pros: Easy for new Computer Science student undergraduates to understand, who are likely to be the new incoming developers of our project.
-
Cons: Logic is duplicated twice. For example, when a new command is executed, we must remember to update both
HistoryManagerandVersionedThanePark.
-
-
Alternative 2: Use
HistoryManagerfor undo/redo-
Pros: We do not need to maintain a separate list, and just reuse what is already in the codebase.
-
Cons: Requires dealing with commands that have already been undone: We must remember to skip these commands. Violates Single Responsibility Principle and Separation of Concerns as
HistoryManagernow needs to do two different things.
-
5.6. Logging
We are using java.util.logging package for logging. The LogsCenter class is used to manage the logging levels and logging destinations.
-
The logging level can be controlled using the
logLevelsetting in the configuration file (See Section 5.7, “Configuration”) -
The
Loggerfor a class can be obtained usingLogsCenter.getLogger(Class)which will log messages according to the specified logging level -
Currently log messages are output through:
Consoleand to a.logfile.
Logging Levels
-
SEVERE: Critical problem detected which may possibly cause the termination of the application -
WARNING: Can continue, but with caution -
INFO: Information showing the noteworthy actions by the App -
FINE: Details that is not usually noteworthy but may be useful in debugging e.g. print the actual list instead of just its size
5.7. Configuration
Certain properties of the application can be controlled (e.g App name, logging level) through the configuration file (default: config.json).
6. Documentation
Asciidoc was used for writing documentation.
| We chose asciidoc over Markdown because asciidoc, although a bit more complex than Markdown, provides more flexibility in formatting. |
If you need to edit the diagrams found in this document, the .pptx files used to create diagrams in this document can
be found in the diagrams folder. To update a diagram, modify the diagram in the pptx file, select the objects of the diagram, and choose Save as picture.
|
6.1. Editing Documentation
See UsingGradle.adoc to learn how to render .adoc files locally to preview the end result of your edits.
Alternatively, you can download the AsciiDoc plugin for IntelliJ, which allows you to preview the changes you have made to your .adoc files in real-time.
6.2. Publishing Documentation
See UsingTravis.adoc to learn how to deploy GitHub Pages using Travis.
6.3. Converting Documentation to PDF format
We use Google Chrome for converting documentation to PDF format, as Chrome’s PDF engine preserves hyperlinks used in webpages.
Here are the steps to convert the project documentation files to PDF format.
-
Follow the instructions in UsingGradle.adoc to convert the AsciiDoc files in the
docs/directory to HTML format. -
Go to your generated HTML files in the
build/docsfolder, right click on them and selectOpen with→Google Chrome. -
Within Chrome, click on the
Printoption in Chrome’s menu. -
Set the destination to
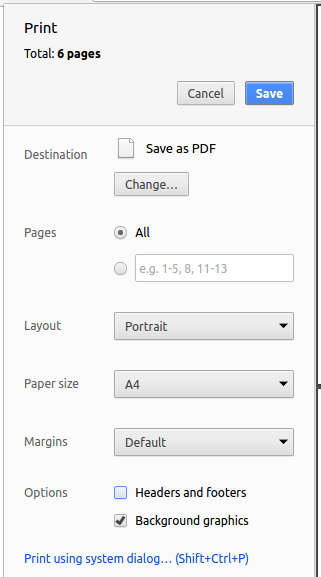
Save as PDF, then clickSaveto save a copy of the file in PDF format. For best results, use the settings indicated in the screenshot below.
6.4. Site-wide Documentation Settings
The build.gradle file specifies some project-specific asciidoc attributes which affects how all documentation files within this project are rendered.
Attributes left unset in the build.gradle file will use their default value, if any.
|
| Attribute name | Description | Default value |
|---|---|---|
|
The name of the website. If set, the name will be displayed near the top of the page. |
not set |
|
URL to the site’s repository on GitHub. Setting this will add a "View on GitHub" link in the navigation bar. |
not set |
|
Define this attribute if the project is an official SE-EDU project. This will render the SE-EDU navigation bar at the top of the page, and add some SE-EDU-specific navigation items. |
not set |
6.5. Per-file Documentation Settings
Each .adoc file may also specify some file-specific asciidoc attributes which affects how the file is rendered.
Asciidoctor’s built-in attributes may be specified and used as well.
Attributes left unset in .adoc files will use their default value, if any.
|
| Attribute name | Description | Default value |
|---|---|---|
|
Site section that the document belongs to.
This will cause the associated item in the navigation bar to be highlighted.
One of: * Official SE-EDU projects only |
not set |
|
Set this attribute to remove the site navigation bar. |
not set |
6.6. Site Template
The files in docs/stylesheets are the CSS stylesheets of the site.
You can modify them to change some properties of the site’s design.
The files in docs/templates controls the rendering of .adoc files into HTML5.
These template files are written in a mixture of Ruby and Slim.
|
Modifying the template files in |
7. Testing
This section covers what you need to know about running and designing automated tests for further development on this application.
7.1. Running Tests
There are three ways to run tests.
| The most reliable way to run tests is the 3rd one. The first two methods might fail some GUI tests due to platform/resolution-specific idiosyncrasies. |
Method 1: Using IntelliJ JUnit test runner
-
To run all tests, right-click on the
src/test/javafolder and chooseRun 'All Tests' -
To run a subset of tests, you can right-click on a test package, test class, or a test and choose
Run 'ABC'
Method 2: Using Gradle
-
Open a console and run the command
gradlew clean allTests(Mac/Linux:./gradlew clean allTests)
| See UsingGradle.adoc for more info on how to run tests using Gradle. |
Method 3: Using Gradle (headless)
Thanks to the TestFX library we use, our GUI tests can be run in the headless mode. In the headless mode, GUI tests do not show up on the screen. That means the developer can do other things on the Computer while the tests are running.
To run tests in headless mode, open a console and run the command gradlew clean headless allTests (Mac/Linux: ./gradlew clean headless allTests)
7.2. Types of tests
We have two types of tests:
-
GUI Tests - These are tests involving the GUI. They include,
-
System Tests that test the entire App by simulating user actions on the GUI. These are in the
systemtestspackage. -
Unit tests that test the individual components. These are in
seedu.thanepark.uipackage.
-
-
Non-GUI Tests - These are tests not involving the GUI. They include,
-
Unit tests targeting the lowest level methods/classes.
e.g.seedu.thanepark.commons.StringUtilTest -
Integration tests that are checking the integration of multiple code units (those code units are assumed to be working).
e.g.seedu.thanepark.storage.StorageManagerTest -
Hybrids of unit and integration tests. These test are checking multiple code units as well as how the are connected together.
e.g.seedu.thanepark.logic.LogicManagerTest
-
7.3. Troubleshooting Testing
Problem: HelpWindowTest fails with a NullPointerException.
-
Reason: One of its dependencies,
HelpWindow.htmlinsrc/main/resources/docsis missing. -
Solution: Execute Gradle task
processResources.
8. Dev Ops
8.1. Build Automation
See UsingGradle.adoc to learn how to use Gradle for build automation.
8.2. Continuous Integration
We use Travis CI and AppVeyor to perform Continuous Integration on our projects. See UsingTravis.adoc and UsingAppVeyor.adoc for more details.
8.3. Coverage Reporting
We use Coveralls to track the code coverage of our projects. See UsingCoveralls.adoc for more details.
8.4. Documentation Previews
When a pull request has changes to asciidoc files, you can use Netlify to see a preview of how the HTML version of those asciidoc files will look like when the pull request is merged. See UsingNetlify.adoc for more details.
8.5. Making a Release
Here are the steps to create a new release.
-
Update the version number in
MainApp.java. -
Generate a JAR file using Gradle.
-
Tag the repo with the version number. e.g.
v0.1 -
Create a new release using GitHub and upload the JAR file you created.
8.6. Managing Dependencies
A project often depends on third-party libraries. For example, Thane Park depends on the Jackson library for XML parsing. Managing these dependencies can be automated using Gradle. For example, Gradle can download the dependencies automatically, which is better than these alternatives.
a. Include those libraries in the repo (this bloats the repo size)
b. Require developers to download those libraries manually (this creates extra work for developers)
Appendix A: Product Scope
Target user profile:
-
Works at a attraction/theme park as manager, operator, customer relations… Mainly for operators.
-
Need to manage crowds and update status of park
-
Highly proficient with keyboard
Value proposition: Manage attraction/theme parks more efficiently.
Appendix B: User Stories
Priorities: High (must have) - * * *, Medium (nice to have) - * *, Low (unlikely to have) - *
B.1. User stories that will be implemented
| Priority | As a … | I want to … | So that I can… |
|---|---|---|---|
|
theme park manager |
identify popularity trends in attractions |
better plan for future expansions |
|
theme park manager |
identify manpower and physical assets shortages |
better manage the staff roster |
|
theme park manager |
find less popular rides |
replace them with better ones, to keep the park fresh for visitors… |
|
theme park manager |
add/delete attractions |
let operators know the changes in the park. |
|
theme park manager |
find detailed information about an attraction |
perform planning with better knowledge. |
|
theme park manager |
view history |
perform some amount of audit on the actions of employees. |
|
attraction operator |
monitor status of attractions |
appropriately handle crowds and technical faults. |
|
attraction operator |
update the system on the queue status of the attraction I am stationed at |
provide everyone access to live data. |
|
attraction operator |
shutdown/reopen attraction |
facilitate maintenance works. |
|
attraction operator |
find detailed information about an attraction |
perform my on-site duties without misinformation. |
|
attraction operator |
view history |
keep track what work I have already completed. |
|
theme park customer relations officer |
know which rides have the longest/shortest queue |
suggest to customers which rides to ride |
|
theme park customer relations officer |
find detailed information about an attraction |
appropriately answer visitor queries on attractions. |
|
non-tech savvy user |
ask the system to complete/correct my sentences |
reduce the need to remember all the commands. |
|
non-tech savvy user |
sort the entries according to a desired order |
get a more comprehensive view. |
|
non-tech savvy user |
view summarized help |
stay not overwhelmed. |
|
non-tech savvy user |
view detailed help about a certain command |
have an idea on how to use the command on unique use cases. |
|
non-tech savvy user |
undo an action |
revert the damage done by my own negligence. |
|
non-tech savvy user |
redo an action |
perform an action that I undone at will. |
|
new user |
find my basic commands |
complete my basic tasks with ease. |
|
new user |
get a quickhelp on startup |
get productive within 30 seconds. |
{More to be added}
B.2. User stories that are kept for consideration for v2.0
| Priority | As a … | I want to … | So that I can… |
|---|---|---|---|
|
theme park manager |
promote less frequented attractions |
there is an increase in utilisation and growth |
|
attraction operator |
give suggestions |
new/confused visitors have a destination |
|
attraction operator |
minimise waiting time for visitors |
they can play more and wait less |
|
attraction operator |
know which souvenirs sells the most |
increase revenue for the theme park |
|
attraction operator |
get a priority on offering visitors with the option of patronizing a less crowded attraction and coming back later without having to queue |
visitors do not feel mistreated. |
|
attraction operator |
track visitors visiting an assigned attraction |
visitors cannot cheat the queue system |
|
attraction operator |
track ongoing promotions |
visitors will be offered reward points for visiting promoted attractions |
|
theme park customer relations officer |
know which rides the customers like most/least |
upgrade rides to fit the customers’ needs |
|
theme park customer relations officer |
know which rides have the longest/shortest queue |
suggest to customers which rides to ride |
|
theme park customer relations officer |
get recorded feedback from visitors |
I will be able to have a better performance/ do my job better |
|
theme park customer relations officer |
better appease visitors |
they are more inclined to return |
|
theme park customer relations officer |
give compensation to dissatisfied visitors |
raise the approval rating of the park |
|
theme park customer relations officer |
give a suggested itinerary (randomized) |
visitors can enjoy more rides with their money’s worth |
|
theme park customer relations officer |
make visitors feel welcomed in the park |
they can enjoy themselves |
|
theme park customer relations officer |
give directions to a less crowded food joint |
visitors can enjoy a meal with their friends/family |
|
theme park customer relations officer |
register visitors’ souvenir shopping list |
visitors do not need to carry bulky souvenirs around |
|
theme park customer relations officer |
find a less crowded shop to buy souvenir |
Appendix C: Use Cases
Use case: Add attraction
System: ThanePark
Actor Manager
MSS
-
User adds attraction.
-
ThanePark shows add success message.
Use case ends.
Extensions
-
1a. User adds attraction that already exists.
-
1a1. ThanePark shows add error message.
Use case ends.
-
Use case: Delete attraction
System: ThanePark
Actor Manager
MSS
-
User deletes attraction.
-
ThanePark show delete success message.
Use case ends.
Extensions
-
1a. User deletes attraction that does not exist.
-
1a1. ThanePark shows delete error message.
Use case ends.
-
Use case: Exit
System: ThanePark
Actor All
MSS
-
User exits ThanePark application.
-
ThanePark completes closing process and shows relevant message.
Use case ends.
Extensions
none
Use case: Find attraction
System: ThanePark
Actor Manager/Operator/Customer relations
MSS
-
User finds an attraction by name.
-
ThanePark shows detailed information of attraction.
Use case ends.
Extensions
-
1a. There is no exact match of given name
-
1a1. ThanePark shows a list of names with substring match.
-
1a2. User finds attraction using complete name as shown.
Use case ends.
-
-
1b. There is no substring match.
-
1b1. ThanePark shows warning message to user.
Use case ends
-
-
1c. User finds an attraction by the name of the zone that it is in and the tags it contains.
-
1c1. ThanePark shows a list of rides that matches the zone and the tags input by the user.
Use case ends
-
Use case: Help
System: ThanePark
Actor Non-tech savvy user
MSS
-
User requests for help.
-
ThanePark shows summarized information for help.
Use case ends.
Extensions
-
1a. User requests for more help.
-
1a1. ThanePark shows normal detail of information for all commands.
Use case ends.
-
-
1b. User requests for help on specific command.
-
1b1. ThanePark shows detailed help with more examples on specific command.
Use case ends.
-
-
1c. User requests for help with extra invalid parameters.
Use case resumes at step 2.
Use case: History
System: ThanePark
Actor Manager/Operator
MSS
-
User requests for history.
-
ThanePark shows history.
Use case ends.
Extensions
-
1a. User requests for history report.
-
1a1. ThanePark generates and shows history report.
Use case ends.
-
Use case: Redo
System: ThanePark
Actor Non-tech savvy user
MSS
-
User requests to redo.
-
ThanePark redoes the next action in the redo queue.
Use case ends.
Extensions
-
1a. Redo queue is empty
-
1a1. ThanePark shows redo error.
Use case ends.
-
Use case: Undo
System: ThanePark
Actor Non-tech savvy user
MSS
-
User requests to undo.
-
ThanePark undoes the most recent undoable action.
Use case ends.
Extensions
-
1a. There is no most recent undoable action as system just started up.
-
1a1. ThanePark shows undo error.
Use case ends.
-
Use case: Update attraction
System: ThanePark
Actor Operator
MSS
-
User requests to update information of an attraction.
-
ThanePark shows the updated state of the attraction.
Use case ends.
Extensions
-
1a. The attraction does not exist.
-
1a1. ThanePark shows an error message for updating the attraction information
Use case ends.
-
Use case: Open attraction
System: ThanePark
Actor Operator
MSS
-
User opens an attraction.
-
ThanePark sets the status of attraction to be open.
Use case ends.
Extensions
-
1a. The attraction does not exist.
-
1a1. ThanePark shows an error message for opening the attraction.
Use case ends.
-
-
1b. The attraction is already open.
-
1b1. ThanePark shows error.
Use case ends.
-
Use case: Shutdown attraction
System: ThanePark
Actor Operator
MSS
-
User shuts down an attraction.
-
ThanePark sets the status of attraction to be shut down.
Use case ends.
Extensions
-
1a. The attraction does not exist.
-
1a1. ThanePark shows an error message for shutting down the attraction.
Use case ends.
-
-
1b. The attraction is already shut down.
-
1b1. ThanePark shows error.
Use case ends.
-
Use case: Maintain attraction
System: ThanePark
Actor Operator
MSS
-
User closes an attraction for maintenance.
-
ThanePark sets the status of attraction to be under maintenance.
Use case ends.
Extensions
-
1a. The attraction does not exist.
-
1a1. ThanePark shows an error message for closing the attraction for maintenance.
Use case ends.
-
-
1b. The attraction is already under maintenance.
-
1b1. ThanePark shows error.
Use case ends.
-
Use case: View a list of all attractions
System: ThanePark
Actor All
MSS
-
User requests to view all attractions.
-
ThanePark shows a summarized view for the whole list of attractions in the park.
Use case ends.
Extensions
none
Use case: View a list of rides that matches the given ride status
System: ThanePark
Actor All
MSS
-
User requests to view attractions by status.
-
ThanePark shows all attractions that matches the ride status.
Use case ends.
Extensions
none
Use case: Filter
System: ThanePark
Actor Manager/Operator
MSS
-
User requests for a filter query.
-
ThanePark shows all attractions that matches the filter criteria.
Use case ends.
Extensions
-
1a. There is no rides that matches the given condition in the query.
-
1a1. ThanePark shows warning message to user.
Use case ends
-
-
1b. The filter query has multiple conditions.
-
1b1. ThanePark shows a list of rides that matches the conditions from the user.
Use case ends
-
Use case: Autocomplete
System: ThanePark
Actor All
MSS
-
User types a command halfway.
-
System idles.
-
User presses tab.
-
System completes the command word for the user.
Use case ends.
Extensions
-
3a. There is more than 1 prefix match for the half-typed command.
-
3a1. ThanePark shows a list of command words that start with the same prefix.
Use case resumes at step 1.
-
-
3b. There is no match for the half-typed command.
-
3b1. ThanePark idles.
Use case resumes at step 1.
-
Appendix D: Non Functional Requirements
-
Should work on any mainstream OS as long as it has Java
9or higher installed. -
Should be able to hold up to 100 attractions without a noticeable sluggishness in performance for typical usage.
-
A user with above average typing speed for regular English text (i.e. not code, not system admin commands) should be able to accomplish most of the tasks faster using commands than using the mouse.
-
System startup should not take more than 10 seconds.
-
User should become productive within first 30 seconds.